Showing posts with label Snacks/Appetizers. Show all posts

Tuesday, January 4, 2011

Parippu Vada

Parippu Vada


Ingredients

  1. Vada thumara / vada parippu - 1/2 kg
  2. Pearl onions - 6 - 8, chopped
  3. Ginger - 2 inch, finely chopped
  4. Dry red chillies - 6 - 7, sliced to thin rounds
  5. Curry leaves - 1 sprig
  6. Salt - To taste
  7. Oil - To deep fry

Method

Soak the vada thumara or vada parippu in enough water for at least 3 hrs. Drain well. Keep aside 2 tbsp of this soaked dal. Crush the remaining vada parippu in a mixer or food processor, without adding any water, to a coarse mixture. Combine it with 2 tbsp vada parippu (that had been kept aside), chopped pearl onions, ginger,  dry red chillies, salt and curry leaves. Crush the whole mixture using your hands (nannayi njeruduka). Make small lemon sized balls from this mixture and flatten them with your palms, like a vada.  Deep fry in oil until brown on both sides. Serve hot with ketchup or any chutney.


Crushed vada parippu mixture with the other ingredientsalt

Tuesday, November 23, 2010

Tandoori Chicken with Green Chutney


Tandoori Chicken


Tandoori chicken is one of the most popular dishes in Indian cuisine. Chicken is marinated with yoghurt and some spices and is cooked at a very high-temperature in a Tandoor or clay oven. It is  is mostly found in menus in Indian restaurants all over the world. Here I have used Vah chef’s recipe with some modifications and the method is from Food for 7 stages of life. You can find Radhika’s recipe and method here. I used to bake it at around 400 - 450 F before but this method calls for baking it at 500 - 550 F. Baking at a higher temperature makes the chicken slightly crispy but juicy inside, which makes it much tastier. Green chutney is an excellent combination with tandoori chicken, you can find its recipe below. You will never have cravings for the restauranty tandoori chicken if you taste this one. Prepare and enjoy!!


Ingredients

  1. Chicken Drumsticks - 6
  2. Ginger-garlic paste - 2 tsp
  3. Turmeric powder - 1/4 tsp
  4. Red chilly powder - 2 - 3 tsp
  5. Pepper powder - 1/2 tsp
  6. Coriander powder - 1 tsp
  7. Kasoori methi - 1/2 tsp
  8. Lemon juice - 2 tsp
  9. Cumin powder - 1/4 tsp
  10. Gram masala powder - 3/4 tsp
  11. Curd - 4 tbsp
  12. Salt - To taste

Method

1. Mix all the ingredients under marinade except the chicken drumsticks. Keep aside.

2. Wash the chicken drumsticks. Do not remove their skin. Pat dry with a paper towel. Make 2 - 3 deep slits on the fleshy part of the chicken so that the marinade can penetrate inside the flesh. Rub the marinade all over the chicken drumsticks one by one. Remember to rub the marinade inside the slits.  Put them in the refrigerator for at least 8 hrs or overnight.

3. Preheat oven to its maximum setting. The maximum temperature that I can set in my oven is 500 F so I baked them at that temperature. Line a cookie pan with aluminum foil. Lightly grease the foil with oil. Arrange the chicken drumsticks on the foil.  Brush the chicken with oil or pour little oil on them ( this step is optional). Place the tray in the center rack of the oven. Bake it for about 12 - 15 minutes. Take out the tray carefully using your oven mitts. Turn them over and  brush/pour a little oil on the chicken pieces (this is optional). Return the tray to the oven. Bake for another 10 - 12 minutes. Take out the tray when the drumsticks are done. Be careful not to burn the chicken pieces. (The juices that surrounds the chicken would be burnt and the skin of the chicken pieces might be stuck to the foil when you take it out.) Slowly take out the drumsticks after 2 minutes using a metal spatula. Enjoy with spicy green chutney.

DSC_0840Tandoori Chicken with Green Chutney

Green chutney

  1. Cilantro - 1 small bunch

  2. Mint leaves - 1/4 cup

  3. Garlic - 1 clove

  4. Ginger - 1/4 inch

  5. Green chillies - 2 small , seeded

  6. Yoghurt -  2 - 3 tbsp

  7. Lemon juice - 2 tsp or to taste

  8. Salt - To taste

Wash the cilantro and mint leaves. Drain well. Blend everything together in a mixer until you get a smooth paste. Adjust the salt and lemon juice. Serve immediately.


DSC_0854

Sunday, November 21, 2010

Chicken Kathi (Kati) Rolls

Chicken Kati Rolls


  These chicken kathi rolls make for a great snack or party food. Kathi roll also known as Kati Roll is a street-food originating from Kolkata, India. Its original form was a kati kabab enclosed in a paratha, but over the years many variants have evolved all of which now go under the generic name of Kati Roll. Today, pretty much any filling rolled up in any kind of Indian flatbread is called a kati roll. The innovations tend to be in two areas - the fillings or the wrap. Common variants on the filling are egg, potato, paneer, mixed vegetables and curried chicken or mutton. More exotic versions can have combinations of ingredients, or fancy curries such as Thai or Schezwan. (Source - Wikipedia). Try these easy and super-yummy kathi rolls.

Ingredients ( Makes 8 - 10 Rotis )

For dough

  1. Plain flour / maida - 1.5 - 2 cups
  2. Wheat flour  (atta) - 1/2 - 1 cup 
  3. Potato - 1 small, boiled and grated
  4. Oil - 1 tbsp
  5. Salt - 1 tsp or to taste

  For the filling

  1. Boneless chicken - 500 gm, cut to small cubes ( I used 2 chicken breasts)
  2. Onion - 1 large, ground to a paste (Chop the onions roughly to large chunks and grind in a mixer to a paste)
  3. Ginger - garlic paste - 2 tsp 
  4. Tomato - 1 large, chopped
  5. Chilli powder - 1/2 tsp
  6. Pepper powder - 1/2 tsp
  7. Salt - To taste
  8. Eggs - 3 , beaten
  9. Lemon juice - 2 tsp
  10. Sliced onion - 1/2 cup
  11. Green chutney - 1/4 - 1/2 cup (See the recipe below)
  12. Oil - 1 tbsp

Method

1. To prepare the dough - In a large bowl mix maida and whole wheat flour. Add grated potato, oil and salt. Mix well. Knead into a firm dough of rolling consistency with some warm water. ( I kneaded the dough in a food processor). Keep aside covered.

2. To prepare the filling, heat oil in a pan at medium heat. Add onion paste, little salt and cook till light brown. Add ginger-garlic paste and cook for a minute. Now add the chopped tomatoes and cook until they get mashed up. Add chilli powder and pepper powder. Mix well.

3. Add the chicken pieces and enough salt. Cover and cook on medium-low flame till chicken turns tender and cooked. Open the lid and stir-fry until they get somewhat dry. Switch off the flame. Check for salt and squeeze lemon juice to taste.

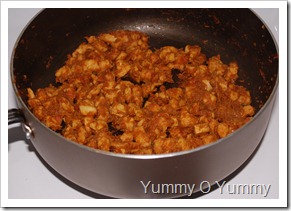
alt Chicken Filling

To prepare the rolls

1. Beat 2 eggs lightly with a pinch of pepper powder and salt. Divide the dough to equal sized balls. Flatten them with a rolling pin. Cook the chapathis on both sides (applying little oil or ghee on both sides, if you like) on a tawa. Pour 2 tbsp of beaten egg on the chapathi and flip it to cook the egg ( do not overcook). Remove from tawa, keeping the egg-coated side up.


2. Arrange chicken filling on the chapathi, add a little green chutney, some sliced onions, sprinkle little lemon/lime juice and kebab/chaat masala, if you like. Roll the chapathi tightly to form the kathi roll. To serve, wrap the lower part of the rolls in a paper napkin, butter paper or aluminium foil.
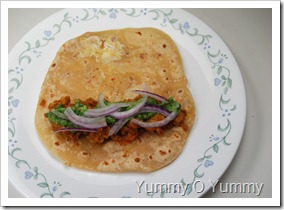
alt Chicken Kaathi Rolls

For the Green chutney

Grind a handful each of cilantro and mint, 1 garlic clove, 1/4 inch ginger, 1 seeded green chilly, 1 tsp lemon juice, 1 tbsp yoghurt and enough salt. Grind to a fine paste.

Chicken Kathi Rolls

Tips:

1. You can prepare these rolls well in advance. At serving time heat in a microwave for a few seconds along with the paper napkin.

2. You can substitute chicken with mutton, beef or pork. Prepare them in a pressure cooker to make them tender.

4. You could also try this recipe with paneer filling and other veggies like bell pepper, tomato, cucumber or even cooked spinach.

5. I have used only about 1-2 tbsp of egg / roti. You can use 1 egg per roti if you wish.

6. You can cook the rotis in advance and keep them covered in an aluminum foil or in a casserole. At serving time, reheat them, pour beaten egg on one side, flip over and cook the egg, arrange chicken filling and roll up. You can even use store-bought chapathis or tortilla breads if you wish.

7. You could also try chicken tikka kati rolls. Click here for chicken tikka recipe.

Thursday, October 14, 2010

Sweet Potato Puzhungiyathu with Thenga and Mulaku Chammanthi


Sweet Potato Puzhungiyathu


  Have you guys tasted sweet potato before? I never knew these light orange colored starchy sweeties were this tasty, until I ate them recently. I used to buy them from the stores thinking that I will use them to make different cakes, scones and other baked goods but it never ever made it into my oven as I could never imagine tasting a cake or any other bake with sweet potatoes! Poor sweet potatoes, every time I look at them they would have grown older and older and would end up sprouting, making its way to the trash :-(. But something changed after I had this sweet potato puzhungiyathu and thenga chammanthi at my friend Manju’s place. I really loved the sweet and spicy combination and the next day itself I went for shopping these beauties and prepared the same.  My hubby too liked it and you know what, its one of our regular evening snacks these days. These chutneys goes really well with kappa puzhungiyathu/ kappa puzhukku also and they tastes best only when fresh. Sweet potato is one of the most nutritious vegetables around with loads of antioxidants. That gives you one more reason to try this recipe. Check out its health benefits here.Try and enjoy!!


Sweet Potato Puzhungiyathu


DSC_0313


Wash and trim both the ends of the sweet potato and cut them into two. Steam them in an idli maker or in a rice cooker. It would not take more than 15 - 20 minutes. Peel off the skin. Serve hot or warm with thenga or mulaku chammanthi.


DSC_0051DSC_0052


Thenga Chammanthi

  1. Coconut - 1/4 - 1/2 cup
  2. Pearl onion - 2
  3. Green chillies or kanthari mulaku (birds eye chilli) - 2 - 3
  4. Curry leaves - 2 - 3
  5. Salt - To taste

Coarsely grind all the above ingredients in a mixer.

Mulaku Chammanthi

  1. Pearl onion - 5 - 6
  2. Green chillies or kanthari mulaku - 5 - 6 , seeded ( I usually seed the green chillies. The hottest part of a chilli is the white membrane that connects the seeds to the flesh. Removing the seeds and membrane before cooking gives a milder flavour.)
  3. Curry leaves - 2
  4. Coconut oil - 2 tsp
  5. Salt - To taste

Crush all the ingredients except coconut oil and salt in a mortar and pestle or a mixer. Traditionally it is crushed in a mortar and pestle. If you are using a mixer, add green chillies first. Give it a pulse and then add the pearl onions and curry leaves. Pulse it again, do not grind the mixture, just crush it. Transfer the mixture to a small bowl. Add enough salt and coconut oil. It tastes best only when fresh.


Sweet Potato Puzhungiyathu

Friday, September 3, 2010

Vazhakoombu / Banana Flower Cutlet

Vazhakoombu Cutlet


Ingredients

  1. Vazhakoombu/ Banana flower - 1 small or 1 cup, chopped fine
  2. Potato - 2 large
  3. Onion - 1 medium, finely chopped
  4. Ginger - 1/2 inch, chopped fine
  5. Garlic - 8 - 10, chopped fine
  6. Green chillies - 5-6, finely chopped
  7. Curry leaves - 2 sprig, chopped
  8. Turmeric powder - 1/4 tsp
  9. Pepper powder - 1 tsp
  10. Garam masala - 1/2 tsp
  11. Coriander leaves - 2 tsp, chopped
  12. Lemon juice - 1 tsp
  13. Egg white - of 1-2 eggs
  14. Bread crumbs - 1/4 - 1/2 cup
  15. Salt - To taste
  16. Oil - For deep-frying

Method

1. Remove 3-4 outer layers of the banana bud and chop it really fine into a vessel with water, salt, oil and turmeric powder. After 15 mts drain and squeeze out the extra water.

koombucutlet

2. Cook the potatoes and mash them well with salt and turmeric powder.

3. Heat oil in a pan and add the chopped onion. Sauté until light brown. Add the chopped green chillies, ginger and garlic. Sauté for 2 minutes. Then add chopped vazhakoombu and salt. Cover and cook for 2 minutes. Open the lid and stir fry until dry. Now add the turmeric powder, chilly powder, pepper powder and garam masala. Stir for a few seconds and add the lemon juice, mashed potato, curry leaves.  Stir at low flame until all the moisture content is completely gone. Check for salt and pepper powder. When it is cooled, make small balls out of it.

4. Beat the egg white adding little salt. Flatten the balls to desired shapes. Dip them in the egg-white and then in the bread crumbs. Heat oil in a pan and deep fry the cutlets (you can also shallow fry it). Drain on to paper towels. Serve hot with tomato sauce.


koombucutlet2


koombucutlet4


Tips:

  1. You can refrigerate the flattened balls dipped in egg white and bread crumbs for 2 days or can even freeze them.
  2. You can add more bread crumbs/ maida  if the cutlet breaks while frying or if it doesn’t hold shape.
  3. You can also use store bought mashed potatoes.

Thursday, August 19, 2010

Sharkkara Varatti / Sharkkara Upperi


sharkkarapuratti5


Here’s the recipe for the sweet jaggery-coated version of banana chips called sharkkara upperi, yet another inevitable part of an Onam sadya.


Ingredients

  1. Raw banana - 1 kg (Around 4-5 bananas)
  2. Jaggery -1 cup
  3. Dry ginger/ chukku and cumin seeds, powdered - 2 tbsp
  4. Cardamom powdered - 1/2 tbsp
  5. Rice flour - 1-2 tbsp (optional)
  6. Sugar - 1 tbsp or to taste (optional)
  7. Coconut Oil - To deep fry

Method


1. Peel off the plantain skin and immerse in turmeric water (mix 1/2 tsp turmeric powder in enough water)  for around 20 minutes. Strain off the excess water and leave to dry or pat dry.
2. Cut each banana into half, lengthwise and then into pieces, of quarter inch thickness. 3. Heat oil in a wide deep pan or an uruli at medium high flame. Be sure not to fill oil more than half - 3/4th of the pan you are using. The oil should  be really hot.( You can test the oil by adding a slice of banana, it would immediately come to the surface bubbling.) When the oil is really hot, bring down the flame and slowly add the banana pieces.  Now increase the flame to medium-high. Stir occasionally with a slotted spoon flipping them to the other side so that the chips wont stick to each other. It will take at least 30 - 45 mts to fry them. When they are done, you can hear a crisp sound and the oil will stop foaming. You can also taste check whether its done or not. Strain them on to a colander, with a plate or any dish underneath to catch any oil drippings. Spread them on paper towels or newspaper to cool.  Let them cool completely.


sharkkarapurattifry


4. Melt the jaggery in  2 - 3 cups of water and strain it.

5. Heat the jaggery in a deep pan or uruli. Bring this to a boil stirring in between. To check the consistency, put one drop of the boiling jaggery in cold water. If it is of the right consistency, it won't dissolve. You can also see thin threads of jaggery syrup when you stir it (nool paruvam). Bring down the heat and add the fried banana pieces. Mix well and stir continuously. It will be really difficult  to stir them. Once the chips are covered with jaggery, add the cumin, cardamom and dry ginger powder. Switch off the flame. Mix and stir well in order to prevent the chips from sticking to each other. Transfer to a wide plate, allow it to cool down completely and then store in an airtight container.

sharkkarapuratti3


sharkkarapuratti2

sharkkarapuratti1


Tips: If the jaggery is not properly coating the raw banana pieces, add rice flour to thicken the syrup (around 1-2 tbsp depending on the consistency of the syrup) and mix well. You could also add sugar ( around 1 tbsp) for thickening the jaggery syrup or if the chips are not sweet enough. You wont need to add either of them if the jaggery syrup has the right consistency.

Wednesday, August 18, 2010

Ethakka Upperi / Banana Chips

upperi1 

   Banana chips is one of the most popular snacks in Kerala. It holds a very important place in a traditional Kerala sadya. In fact there is no onam without banana chips!! When we were kids we used to call it ‘zero upperi’ and jack fruit chips as ‘one upperi’ Smile The peels of the plantains can be used to make plantain peel thoran, you can find its recipe here.

Ingredients

Raw Banana - 4 kg

Salt - 1 tbsp or as required, dissolved in 1/2 cup water, for sprinkling

Turmeric powder - 1/2 - 3/4 tsp

Coconut Oil - To deep fry

Method

1. Peel off the plantains and put them in turmeric water(mix 1/2 tsp turmeric powder in enough water), for about 15 mts. Drain the excess water and leave to dry or pat dry with paper towels. Heat oil in an uruli or a deep, wide mouthed  pan at a medium high flame. Be sure not to fill oil more than half - 3/4 th of the pan you are using. The oil should  be really hot.( You can test the oil by adding a slice of banana, it would immediately come to the surface bubbling). Slice the plantains to thin rounds.  While slicing, remember to apply some oil in your palms to prevent black stains.

banana

raw banana

upperi

2. When the oil is hot enough, bring down the flame to medium and add the sliced bananas carefully to deep fry. Stir immediately for a few seconds, then bring back the flame to medium high. Do not overcrowd, fry them in batches. (You could also slice them directly into the hot oil using a slicer.) Let the sliced bananas cook for 15 - 20 mts (this time depends on the type of pan you are using. We used an uruli and fried them in 2 batches). You can stir it occasionally using a slotted spoon  flipping on both sides but be really careful otherwise the banana slices might break. 

3. Meanwhile keep aside 1 tbsp salt and a pinch of turmeric powder in 1/2 cup water(adding turmeric powder is optional, we didn’t add it). When the chips are almost done(you can hear a crisp sound and the oil will stop foaming, you can also taste check whether its done or not), reduce the heat and sprinkle a little salt-turmeric water(you do not need to add more than 1-2 tsp) into the oil carefully. Move away from the pan after sprinkling since the oil might come up and splash making lots of bubbling noise. You can cover it with a lid immediately after sprinkling salt-turmeric water, remove it when the oil stops splashing. When the bubbles stop coming, stir well and drain on to a colander(do not forget to keep a container or plate below the colander to catch any oil drippings). (If you do not wish to add salt water into the oil, you can sprinkle it immediately when they are drained onto the colander. Just make sure to mix well after sprinkling it.)

4. Now transfer the chips into a paper towel or newspaper spread in a muram(wide bamboo tray) or any plate. Repeat for the next batches. Remember to sprinkle less salt water for the next batches as the oil already contains some salt that you added before. Cool and store them in an airtight container.

upperi3

Monday, June 14, 2010

Achappam/Rose Cookies

Achappam is a popular snack in Kerala which is crunchy and mildly sweet. It is made using a special achu or a round mould which is flower shaped. Here is the recipe:

IMG_5849

Ingredients

  1. Raw Rice flour/Pacha aripodi - 2 cups
  2. Eggs - 2
  3. Coconut milk -  1 - 1.5 cup (half can) or as required
  4. Sugar - 1/4 cup or to taste
  5. Black sesame seeds - 1 tbsp or as required
  6. Salt - A pinch
  7. Oil - For deep-frying

Method

IMG_5834

1. Mix the rice flour, beaten egg, coconut milk, sugar, black sesame seeds and salt. Consistency  should be similar to that of dosa batter. Keep the batter aside for half an hour.

IMG_5841 IMG_5842

2. Heat oil in a deep pan. Dip the mould in hot oil for a minute or until it is hot. Now dip about 3/4th of the mould in the batter and then dip it in the hot oil. Shake the mould slightly after about 20 seconds or when they are semi cooked, so that the achappam will separate easily from the mould. Fry both sides until golden brown and drain onto a paper towel. Remember to dip the mould in hot oil each time before dipping it in the batter, otherwise the achappam would not separate from its mould. Repeat until the batter is finished. Store in an airtight container when they are cooled completely.  Enjoy!!


IMG_5845

Friday, June 4, 2010

Sweet Kozhukkatta(Rice Dumplings) and Nadan Kozhukatta

Kozhukatta

    Kozhukkatta is a popular Indian sweet. There are different kinds of kozhukatta like kozhukatta filled with jaggery and coconut, jack fruit kozhukatta, nadan kozhukatta made with rose matta rice etc. Lakshmi had planned to post this yummy jaggery-coconut filled kozhukatta recipe yesterday. I then thought of my of mother’s nadan kozhukatta which I loved and took her recipe yesterday to share with you all. The nadan kozhukatta requires no sweet filling, it is tasty as it is (though its not as tasty as the sweet jaggery filled kozhukatta. I soaked the rice yesterday night and prepared it an hour back. Here are the recipes: 

Ingredients

  1. Rice flour - 1 cup (You can use puttu podi or idiyappam podi)
  2. Grated coconut - 1/2 - 3/4 cup
  3. Jaggery - 1/4 cup or sugar (2-3 tbsp or to taste)
  4. Cumin seeds - 1/4 tsp
  5. Cardamom powder - A pinch (Optional)
  6. Salt - To taste
  7. Boiling Water - As required

Method

1. Mix the grated coconut and jaggery well.

2. Heat some water in a vessel adding salt. Add the hot water little by little to the rice flour until a smooth dough is formed.

IMG_5768

3. Roll the dough into medium sized balls and flatten them with your palm. Fill it with the jaggery-coconut filling and reshape it into a ball. Steam the balls in a steamer or idli cooker for about 15 - 20 mts.


 IMG_5773

IMG_5778

Kozhukatta


Tips :


1. You can avoid using jaggery in this recipe. Instead of filling the balls with grated coconut, just add it to the dough and knead well.

Nadan Kozhukatta

 DSC_0403


Ingredients

  1. Kerala rose matta rice/Kuthari - 1 cup
  2. Grated coconut - 1 cup
  3. Cumin seeds - 1/2 tsp
  4. Salt - To taste

Method

1. Soak rice in water for about 10 - 12 hrs.

DSC_0389 


2. Grind it in a mixer adding water little by little until you get a coarse mixture. Heat a deep pan. Add the ground mixture and stir until the water evaporates at medium heat (takes about 5 - 10 mts). Check for salt. Make lemon sized balls out of it and steam for about 15 - 20 mts or until done.


DSC_0390 


DSC_0393


DSC_0397 


Nadan Kozhukatta


Tips:

1. You can also grind sugar (1-2 tbsp) along with the soaked kuthari rice, grated coconut, cumin seeds and salt.

Tuesday, May 25, 2010

Almond Cookies

DSC_0137


Ingredients (Yield - 20 cookies)

  1. All purpose flour - 1/2 cup
  2. Almond flour - 1/2 cup
  3. Baking powder - 1/8 tsp
  4. butter - 1/4 cup, softened
  5. Granulated sugar -  1/4 - 1/2 cup
  6. Egg white -  1 egg ( I halved the recipe that I followed. The recipe called for half an egg white. I used the egg white of 1 egg, so I had to use extra almond flour (almost 3/4 cup) to adjust the dough consistency)
  7. Almond extract - 1/4 tsp
  8. Whole almonds - 20
  9. Salt - To taste


Method

1. Stir the all purpose flour, almond flour, baking powder and salt in a bowl.

2. Cream butter and sugar at medium speed of hand mixer. Beat in the egg white and almond extract.


DSC_0103


DSC_0107


3. Add in the all purpose flour and almond flour to the creamed mixture. Cover and chill for 2 hrs.


DSC_0109


4. Shape into 3/4 inch balls, flatten them slightly with your palms or with the bottom of a glass and place them at least 2 inches apart. Press an almond to the centre. Bake at 350 F for about 12 mts (mine took around 15 mts) or until lightly browned at the bottom. Cool on the baking sheet for a few minutes and transfer to a wire rack to cool completely.


DSC_0111


DSC_0138


Recipe Courtesy : About.com